POST OPERATIVE INSTRUCTIONS
SHOULDER STRETCHING
Phase I: Shoulder Stretching
These exercises are designed to increase motion. In these exercises the stiff shoulder is assisted by the good arm, by gravity or by a pulley. Whenever possible, apply moist heat and take your pain medication one half hour prior to exercising. These exercises should be done two to three times daily BUT each session should last only 5 minutes at most. Perform three to five repetitions of each exercise. Do not exercise two hours prior to retiring for the night.
1. PENDULUM EXERCISE

Bend forward at the waist and try to make your back parallel to the floor. Use your good arm to hold the side of a table or bed for balance. Let the stiff arm relax and dangle like a pendulum, then gently swing in a circle (Fig. 1). After a short while, allow the arm to swing back and forth as if you were bowling.
Figure 1 Phase I Stretching: Pendulum exercise done primarily for warm up.
2. ASSISTED SUPINE ELEVATION

Lie on your back, on your bed or couch. DO NOT use a pillow. Grasp the wrist of your stiff shoulder with your good hand and pull the stiff arm toward the ceiling and then overhead. Hold it there for about 5 seconds. This may be repeated two or three times at each exercise session (Fig. 2).
Figure 2 Phase I Stretching: Assisted supine elevation.
3. ASSISTED EXTERNAL ROTATION

Again, lay on your back on the couch or bed without a pillow. Place a folded towel under the elbow of the stiff arm so the entire upper arm is parallel to the floor. The elbow may be 2 to 4 inches from you side. Use a stick to rotate the arm as indicated but be sure to keep the elbow bent at 90°. (Fig. 3A and B).
Figure 3 (A) Phase I Stretching: Passive external rotation. Note the elbow is situated on a pillow to keep the arm parallel to the floor. (B) Phase I Stretching: Passive external rotation. The arm is rotated out to the side while maintaining the elbow at 90° flexion.
4. ASSISTED ELEVATION WITH A PULLEY

Pulley Placement: The pulley must be at least 1 foot higher than the extended reach of the shoulder. You must stand directly under the pulley.
The pulley exercise assists patients in passive elevation of the arm (Fig. 4). Use the pulley as demonstrated by your doctor or physical therapist utilizing the power of your normal shoulder to elevate the stiff one. It does not matter if you rise up on your toes; just reach for the pulley with your hand.
Figure 4 Phase I Stretching: Assisted elevation with a pulley. This is best performed while standing, not sitting, which is more convenient but less efficient and effective.
5. ASSISTED ABDUCTION

Lay on your back without a pillow. Again, use the good arm to lift the stiff shoulder but clasp your hands as indicated and place both hands behind your head as shown (Fig. 5). Then allow the elbows to fall to the side; they should touch the bed or couch.
Figure 5 Phase I Stretching: Assisted abduction.
Phase II: Shoulder Stretching
These exercises continue the stretching phase of your shoulder rehabilitation. Your doctor will begin these two to four weeks following surgery, once your wound has healed satisfactorily. Do these together with the Phase I program. Each exercise should be performed five times at 2 exercise sessions.
1. ASSISTED INTERNAL ROTATION

Place both arms behind the back, using the hand of your good arm grasp the wrist of your stiff arm. Use the power of your good arm to push the stiff arm up your back as far as possible (Fig.1).
Figure 1 Phase II Stretching: Assisted internal rotation.
2. ASSISTED ELEVATION

Lie on your back without a pillow. Using your good arm, lift the stiff arm up and arch your back so your hands can reach under the headboard as shown. Gradually lower your chest and back to the bed, stretching your shoulder (Fig. 2).
Figure 2 Phase II Stretching: Assisted elevation.
3. ASSISTED EXTERNAL ROTATION
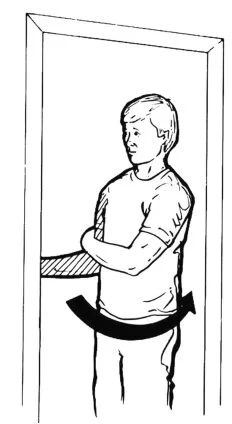
Stand in a doorway with the elbow of the affected shoulder placed against your side and flexed to 90°. Keep the elbow tight against your side and with your hand fixed firmly in the doorway, slowly rotate your body away from your hand. Position your good arm as shown to hold the stiff arm up against your body (Fig. 3).
Figure 3 Phase II Stretching: Assisted external rotation.
Phase III: Shoulder Stretching
These exercises are designed to help you attain the last 20 degrees of your shoulder motion in all directions. These exercises should be done twice daily, preferably immediately following a hot shower.
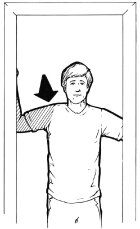
1. ASSISTED ELEVATION

Find a “convex” corner in your house. Stand about 12 to 14 inches away from the corner and stand at 45 degrees to the corner as your doctor or therapist shows you. Use the power of your good shoulder to lift the stiff arm up against the corner as shown. You must keep the elbow straight. The major concentration should be to keep the elbow straight and apply minimal pressure on the corner with the hand of your affected extremity. Slowly lean into the corner, allowing the arm to rise up the wall. You should strive to have your armpit touch the wall. (Fig.1)
Figure 1 Phase III Stretching: Assisted elevation.
2. ASSISTED ELEVATION ASSISTED EXTERNAL ROTATION
Stand in a doorway (or corner) as shown in fig. 2 with your forearms flat against the door jam so the upper arm is parallel to the floor. Gradually lean forward into the open doorway and hold the position for 5 seconds, then relax (Fig. 2).
Figure 2 Phase III Stretching: Assisted external rotation.
3. ASSISTED INTERNAL ROTATION

Stand with your back up against a table or ledge as shown in fig.3. Place the hand of the stiff shoulder on the table keeping your hand near your spine as indicated. Gently flex your knees and stoop to the ground which will slowly stretch your arm up your back (Fig. 3).
Figure 3 Phase III Stretching: Assisted internal rotation.
4. ASSISTED ADDUCTION

This exercise is most important in trying to get sleep at night. Use the power of your good shoulder to lift the stiff arm up to shoulder level near your chin and parallel to the floor. Gradually pull the arm under your chin as shown. Hold for 5 seconds and repeat (Fig. 4).
Figure 4 Phase III Stretching: Assisted adduction.
Dr. McAllister's Orthopedic and Sports Medicine Areas of Speciality